Reeds: The Internal Geometry of Hard D vs Back D
Originally published in The Pipers' Review 2009
 There’s
a well-known penalty for an increasingly easy hard D: a weak back D. In
addition to the exterior adjustments of scrape and length trimming, there’s
an interior geometric factor that can be manipulated and often with very
little change to the blades. The key is the change of curvature at the
tip of the blades, a curve that in traditionally made reeds gradually increases
from the lips toward the staple.
There’s
a well-known penalty for an increasingly easy hard D: a weak back D. In
addition to the exterior adjustments of scrape and length trimming, there’s
an interior geometric factor that can be manipulated and often with very
little change to the blades. The key is the change of curvature at the
tip of the blades, a curve that in traditionally made reeds gradually increases
from the lips toward the staple.
If the curvature remains almost as shallow as at the lips, too far along
the blade toward the staple, hard D becomes easier while back D becomes
more unstable. Since reeds often flatten especially in the tip end a bit
as they age, this is an important reasn that back D’s can weaken over time.
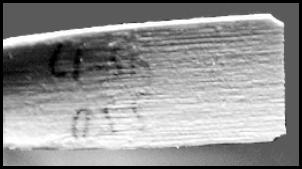
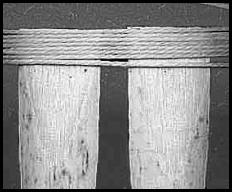
This reed had aged into a sinking back D, along with a very easy hard D,
and the photo of the inside of a blade shows why. The shadow shows that
the entire top 1/3 of the blade, at the right side of the photo, has the
same shallow curve as the lips.
 The
traditional remedy is to trim the lips or move the bridle higher. But with
so much of the end of the blade having relaxed into the same very low curvature,
adjustment from the outside may not have revived it. So even though this
blade was already scraped thin, it was worth trying to create a greater
interior arch just below the lips by sanding the interior on a curved cylinder.
Only a tiny amount of cane needs to be removed, little enough that often
the blade is not weakened too much.
The
traditional remedy is to trim the lips or move the bridle higher. But with
so much of the end of the blade having relaxed into the same very low curvature,
adjustment from the outside may not have revived it. So even though this
blade was already scraped thin, it was worth trying to create a greater
interior arch just below the lips by sanding the interior on a curved cylinder.
Only a tiny amount of cane needs to be removed, little enough that often
the blade is not weakened too much.
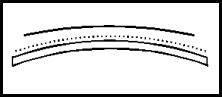
 A
wide cylinder that is only slightly more curved than the lips is chosen,
medium to fine sandpaper placed on it indicated by the dotted line in the
diagram, and the upper end of the reed interior is sanded on it. Approach
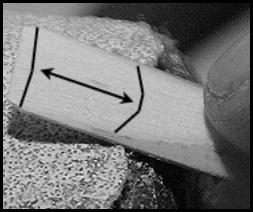
the lips no closer than about 3/16” or 4-5 mm. The photograph shows the
region to be sanded. If the particular blade has more curvature around
the middle of the scrape, cut your sanding length in half or so, still
beginning near the lips, but reaching only a short distance toward the
staple. If a cylinder is used too far toward the tails, it begins to cut
into the edges of the reed and cause leaking.
A
wide cylinder that is only slightly more curved than the lips is chosen,
medium to fine sandpaper placed on it indicated by the dotted line in the
diagram, and the upper end of the reed interior is sanded on it. Approach
the lips no closer than about 3/16” or 4-5 mm. The photograph shows the
region to be sanded. If the particular blade has more curvature around
the middle of the scrape, cut your sanding length in half or so, still
beginning near the lips, but reaching only a short distance toward the
staple. If a cylinder is used too far toward the tails, it begins to cut
into the edges of the reed and cause leaking.
If the low interior curvature has also caused the octave to go flat,
you can use a 2nd or 3rd cylinder, increasingly narrow,
to sand increasingly curved zones closer and closer to the position of
the staple eye. This will open up more airspace inside the head, flattening
the 1st octave and sharpening the 2nd octave a bit.
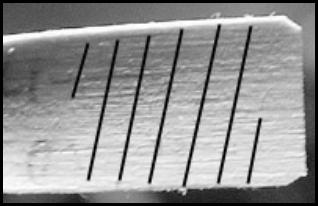 The
change in this blade was so little that it’s difficult to photograph clearly,
so I’ve overlaid black lines to illustrate the area that was sanded. You
may be able to see in this view that the very tip of the reed at right
is a bit smoother than the area under the lines, and that there is just
a little more shadow visible under the upper edge (in the photo) of the
blade indicating that the blade has a small increase of curvature.
The
change in this blade was so little that it’s difficult to photograph clearly,
so I’ve overlaid black lines to illustrate the area that was sanded. You
may be able to see in this view that the very tip of the reed at right
is a bit smoother than the area under the lines, and that there is just
a little more shadow visible under the upper edge (in the photo) of the
blade indicating that the blade has a small increase of curvature.
When this reed was reassembled, the back D was strong again, without
any trimming of the lips, and the hard D was not compromised.
Both blades need to be examined. It’s not unusual for one blade to be
more flattened than the other, and in that case only the flatter blade
may need treatment.
If instead back D is solid while hard D is very difficult to sound,
the upper interior is often too curved close to the lips.
If the edges and corners are reasonably thick, sanding the very tip
on a slightly wider cylinder may ease the hard D a little. Otherwise the
blades can be wet, and the upper ¼” of the tip firmly bound onto
a wider cylinder, and allowed to dry for several days.
David Daye
Cuyahoga Falls, OH